
In today’s article I’d like to discuss Azure IoT Edge and how you can get started with it. I will be explaining the benefits of Azure IoT Edge and providing a couple of demos to demonstrate how you can create a very simple IoT solution using an IoT Edge device.
Benefits of Azure IoT Edge
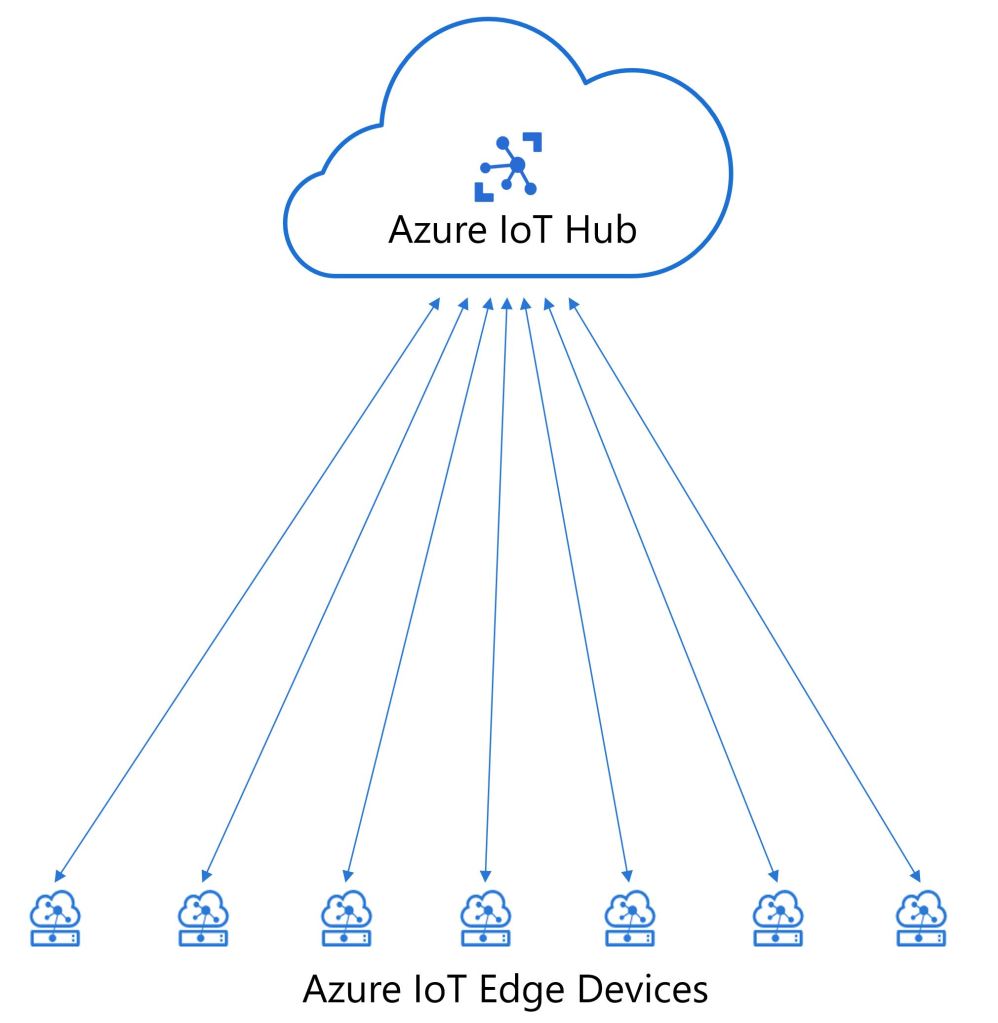
Azure IoT Edge is Microsoft’s fully managed service built on IoT Hub, which enables users to perform edge computing on one or more IoT Edge devices. Edge computing is the idea that the IoT devices (at the “edge” of the network) are the ones performing the heavy computing instead of server processes in the cloud.
This is beneficial as the individual devices can perform the calculation/processing/analysis and send the resulting insights to the cloud, instead of the devices sending all the raw data to the cloud for processing. Using edge computing results in reduced bandwidth costs, faster response times and reduced traffic.
Azure IoT Edge Components
There are three components that make up Azure IoT Edge:
- IoT Edge Modules
- IoT Edge Runtime
- Cloud Interface
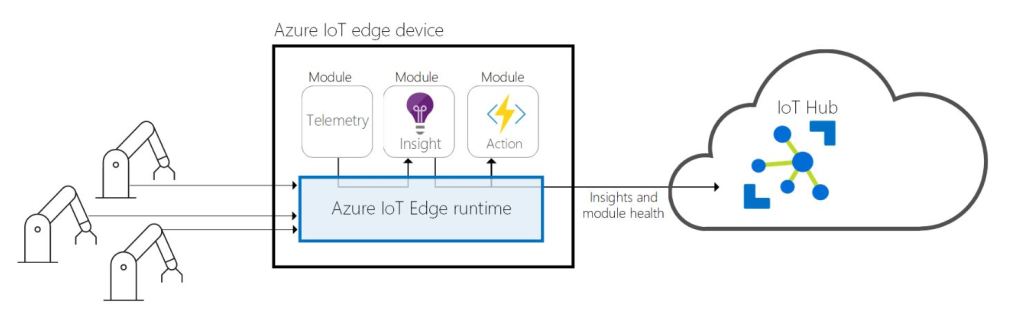
IoT Edge Modules are the Azure or third-party services that run in containers. You can also provide your own code. These modules are deployed to the IoT Edge devices and run locally on those devices. They provide the Edge “magic” as they can perform calculation/processing/analysis of your device data.
The IoT Edge Runtime is the code that runs on each IoT Edge device and manages the modules running on the device. The runtime also performs tasks such as maintaining security on the device, reporting module health to the cloud and managing communications between any downstream leaf devices and the IoT Edge device, between modules on the IoT Edge device and between the cloud and the IoT Edge device.
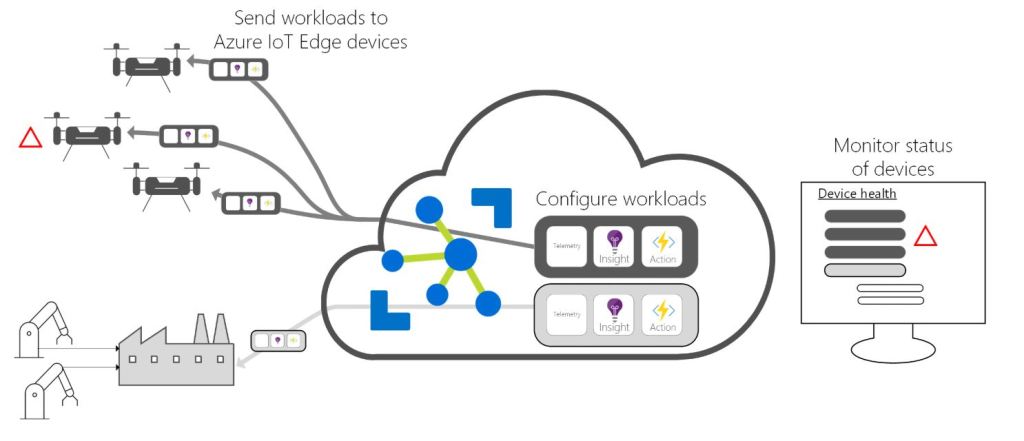
The cloud interface provides the ability to centrally manage the lifecycle for your IoT Edge devices. You can create and configure one or more workloads for your devices, as well as deploy them to all of your devices. You can also monitor your devices for any errors or devices that are not behaving properly.
Deploying an IoT Edge Module
The first demo I’d like to show you involves setting up a virtual IoT Edge device and deploying some sample code. We will also create an IoT Hub so the device can send its data to it.
Prerequisites
For both of these demos there are a couple of prerequisites that you will need. The first is an Azure subscription as we will be creating some cloud resources in these demos. You can sign up for a free account here.
The other prerequisite is installation of the Azure IoT Extension for Azure Cloud Shell. You can add this extension by launching a Cloud Shell session after logging into your Azure Portal. Once the shell window displays enter the following command to install the extension:
az extension add --name azure-iot
You only need to run this once.
Setup of IoT Edge Device
We will be using a virtual machine (VM) hosted in Azure as our IoT Edge device. I will run through the setup and configuration of this VM using Linux (there are similar steps if you wish to use a Windows VM).
There are two ways you can create a VM in Azure. The first way is to manually go through the steps in the Azure Portal to provision a VM. You should select the latest Ubuntu Server build for your image if you’re provisioning a Linux VM. This will give you a standard VM with no additional components installed. You would then be required to manually install the Azure IoT Edge components afterwards.
The second way to create this VM is to use the Azure Cloud Shell. I prefer this way as you can select a custom IoT Edge image that also automatically installs all the components needed to run IoT Edge on the VM (acting as a device). Accept the terms of use and create a VM by executing these commands:
az vm image terms accept --urn microsoft_iot_edge:iot_edge_vm_ubuntu:ubuntu_1604_edgeruntimeonly:latest
az vm create --resource-group IoTEdgeResources --name EdgeVM --image microsoft_iot_edge:iot_edge_vm_ubuntu:ubuntu_1604_edgeruntimeonly:latest --admin-username azureuser --generate-ssh-keys
Note that the commands expect you have a resource group created called IoTEdgeResources. The VM will be provisioned with a name of EdgeVM, and with an administrator username of azureuser and SSH public key authentication. You can see the command-line switch of –generate-ssh-keys which will generate the public and private keys and store them in the ~/.ssh folder in your Azure Cloud Shell instance.

Creating Azure IoT Hub and Device Registration
The next step is to provision an instance of Azure IoT Hub and register an IoT Edge device. Again, you can do this in two ways. The first is to manually run through the steps in the Azure Portal to provision IoT Hub and register your IoT Edge device.
The other way is to use the Azure Cloud Shell. Here are the commands to instantiate IoT Hub and register an IoT Edge device. Please note the resource group of IoTEdgeResources and make sure you enter your own name for the IoT Hub and Edge device. Take note of the –edge-enabled command-line switch, as this is what tells Azure to register a device as an IoT Edge device.
az iot hub create --resource-group IoTEdgeResources --name {hub_name} --sku F1 --partition-count 2
az iot hub device-identity create --hub-name {hub_name} --device-id {device_name} --edge-enabled
Once these commands finish, run the following command to display the device connection string and save it for a later step.
az iot hub device-identity show-connection-string --device-id {device_name} --hub-name {hub_name}

Configure IoT Edge Device
Now that we have Azure IoT Hub and a registered IoT Edge device, we need to set the connection string with the value you saved previously from your registered IoT Edge device in IoT Hub. This will configure the VM to send its data to that registered device in Azure.
In your Azure Cloud Shell instance enter the following command, replacing for the IoT Edge device connection string:
az vm run-command invoke -g IoTEdgeResources -n EdgeVM --command-id RunShellScript --script "/etc/iotedge/configedge.sh '{device_connection_string}'"
Please note that running this command expects that the IoT Edge runtime is already installed on the VM. Since we used the Azure IoT Edge on Ubuntu image when provisioning the VM, this has already been installed. When complete, the output should look similar to this:

Once this command is complete you will need to connect to the VM using the public IP address that was given when the VM was created. This can be done right in the Azure Cloud Shell with this command:
ssh azureuser@{publicIpAddress}
The first time you do this you will be prompted to establish the authenticity of the host. Enter yes to continue connecting. This will also add an entry into a known_hosts file (so you are not prompted in the future).

Alternatively, you can use an SSH client (like PuTTY) to SSH into your VM. However, be aware that you need to copy the public and private SSH keys from your Azure Cloud Shell locally and create a .ppk file that PuTTY can use for authentication. Instructions on how to do this are located here.
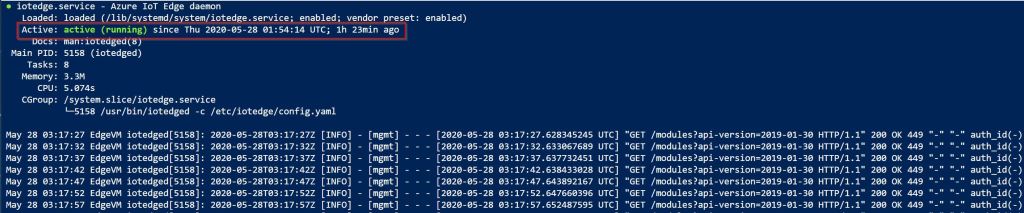
Verify that the IoT Edge security daemon is running properly as a system service by executing the following command:
sudo systemctl status iotedge
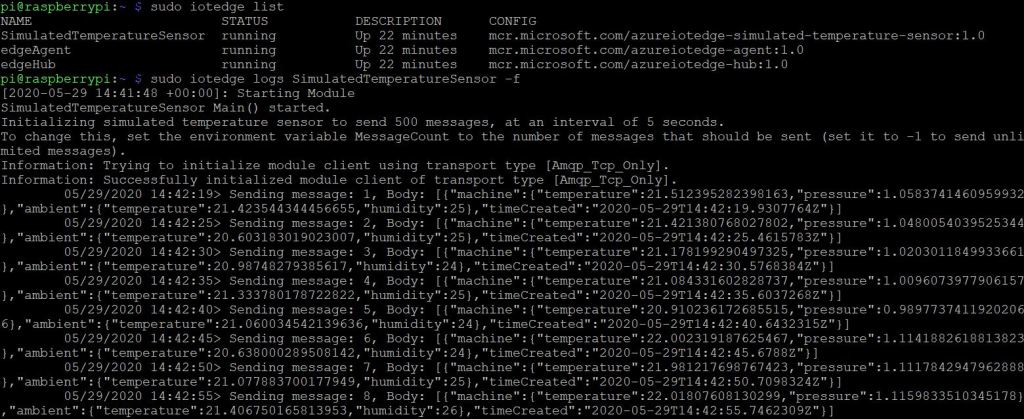
You can also view the running modules on the device. At this point you should only see the edgeAgent running.
sudo iotedge list

Deploy IoT Edge Module
We can now deploy our module to the IoT Edge device. We are going to use a pre-built module from the IoT Edge section of the Azure Marketplace, which sends simulated temperature and pressure data to the cloud. You can also use your own custom code.
Note that we don’t have to access the device to deploy this module – we can perform the deployment right from the cloud. IoT Edge modules are executable packages implemented as containers. In order to deploy our module, navigate to your IoT Hub in the Azure Portal. Click on IoT Edge under Automatic Device Management from the left-hand pane.
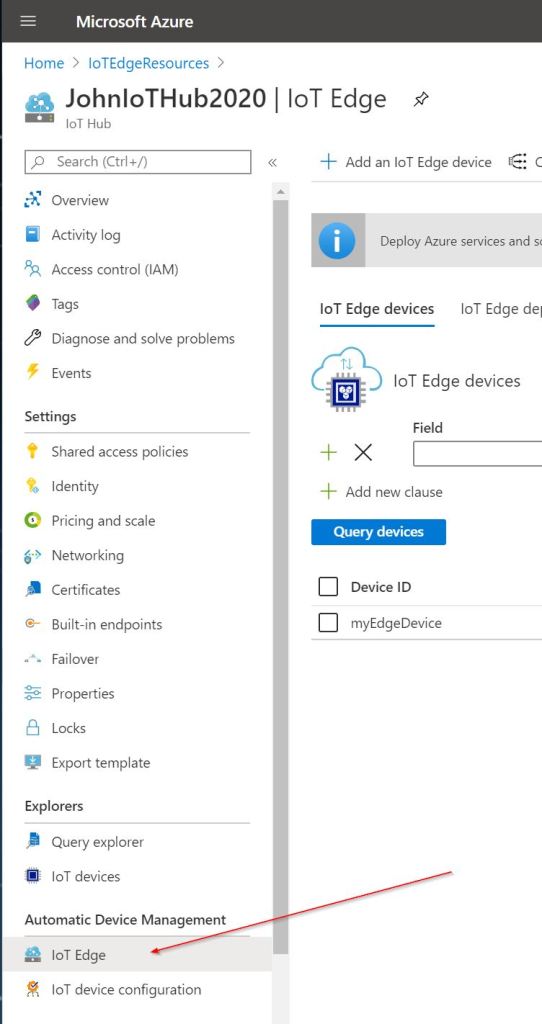
Click on your device in the list and select Set Modules from the upper bar. Click on the Add button to dropdown a menu selection. Click on +Marketplace Module to add a module from the marketplace.
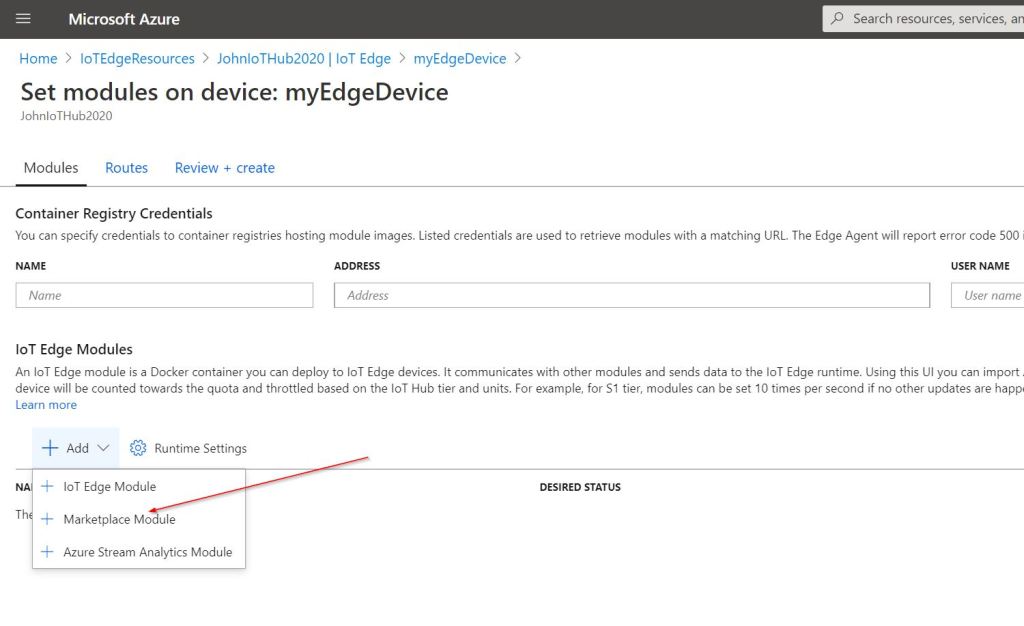
Enter simulated temperature sensor in the search box and select the results displayed. Click Routes to continue.

You also need to configure the routes, which define how messages are passed between the module and IoT Hub. For our example, we want all the messages from the module to be sent to IoT Hub ($upstream), so add the following code for the Value for $upstream (if not auto-populated):
FROM /messages/* INTO $upstream
Click Review + Create and then Create to deploy the module.
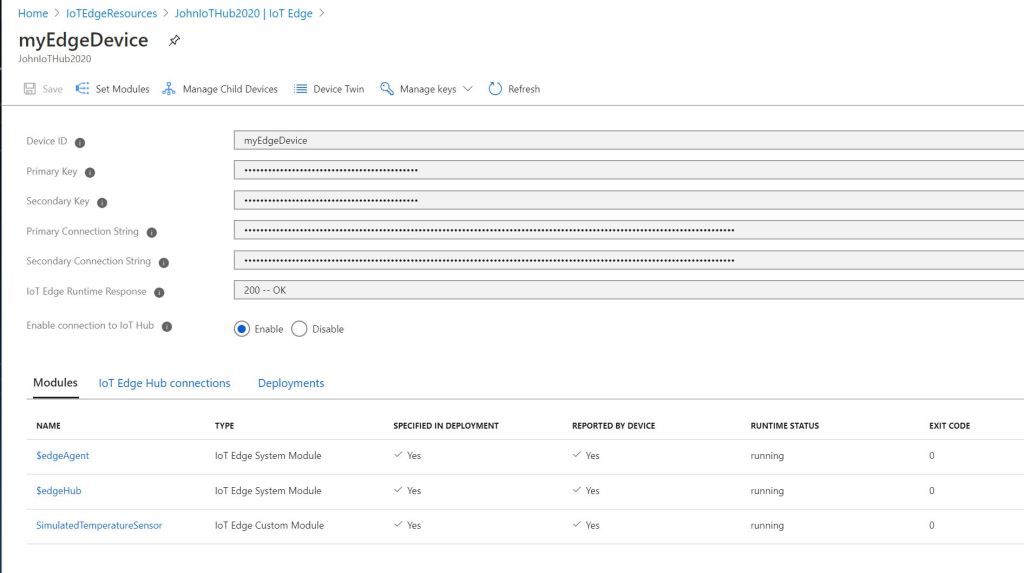
After a few minutes if you refresh the page in the Azure Portal that lists the modules running on your device, you will see the SimulatedTemperatureSensor appear and show that its runtime status as running. Azure doesn’t push anything to your device when you add a module – the device checks Azure periodically for updates and when it sees that a module needs to be deployed it then pulls that module image from the cloud to start running it locally.
Viewing the Data
You can view the simulated data from your IoT Edge device in two places. If you SSH into the VM and run the following command you can see the Simulated Temperature Sensor module executing and displaying the data it is sending to the cloud.
sudo iotedge logs SimulatedTemperatureSensor -f
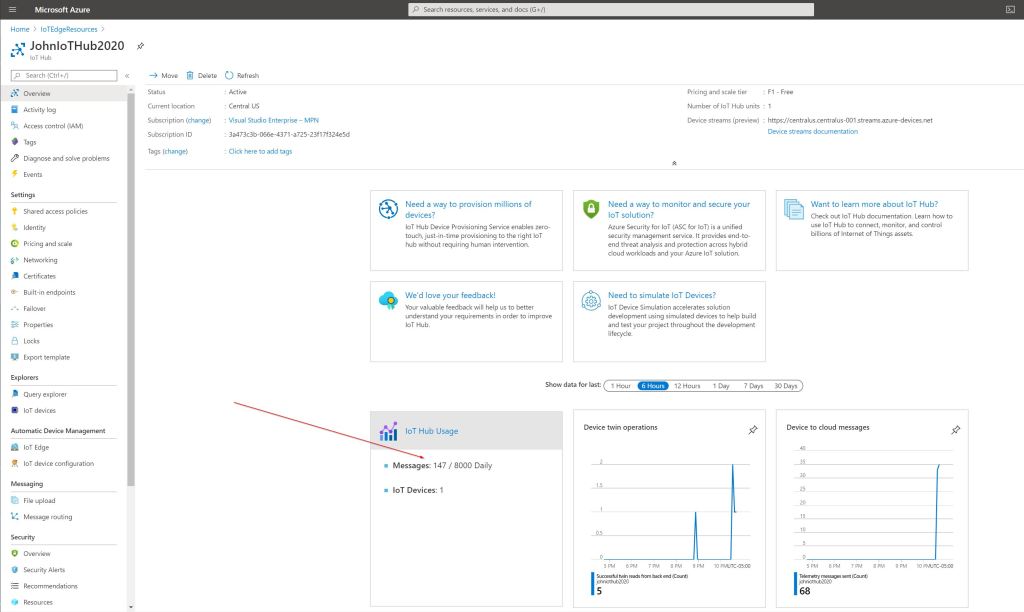
You can also see the messages being received in your IoT Hub in the Azure Portal on the Overview page:
Deploying to a Physical Device
The second demo I’d like to show you is how to deploy IoT Edge to a physical device. Using simulated devices is great for initial learning but I always like to actually deploy to a physical device since you will need to do this on an actual project! You will need a device that supports IoT Edge – I am using a Raspberry Pi 4 for this demo. You can use whatever device as long as the operating system can run containers. Please see this link for more details.
Most of the steps for the first demo still apply – the only difference is that instead of creating a virtual machine to simulate the IoT Edge device we will be using a real device (Raspberry Pi in our case). With that in mind, the first thing you should do is install the latest version of Raspian OS on your Pi.
Once you have the OS installed and you can SSH into the device, you will need to install the container runtime and the Azure IoT Edge components. The recommended container runtime is Moby. Run the following Bash commands on your device to update the package lists and install the Moby engine.
sudo apt-get update
sudo apt-get install moby-engine
You can optionally install the Moby command-line interface, which is helpful for development environments. When I ran this command the system indicated it was already installed when I installed the Moby engine.
sudo apt-get install moby-cli
After the container runtime is installed the next step is to install the Azure IoT Edge security daemon. This provides and maintains security standards on the device and bootstraps the device by starting the IoT Edge runtime when you boot up the device. Run the following Bash command to install the security daemon.
sudo apt-get update
sudo apt-get install iotedge
Once the security daemon is installed you then need to configure the IoT Edge device with the device connection string from your IoT Edge device in IoT Hub. This links your physical device to the device identity in the cloud. Open the configuration file at /etc/iotedge/config.yaml with this command:
sudo nano /etc/iotedge/config.yaml
Scroll down to the Manual Provisioning section and update the value of device_connection_string with your device connection string. Save the file when you are finished.
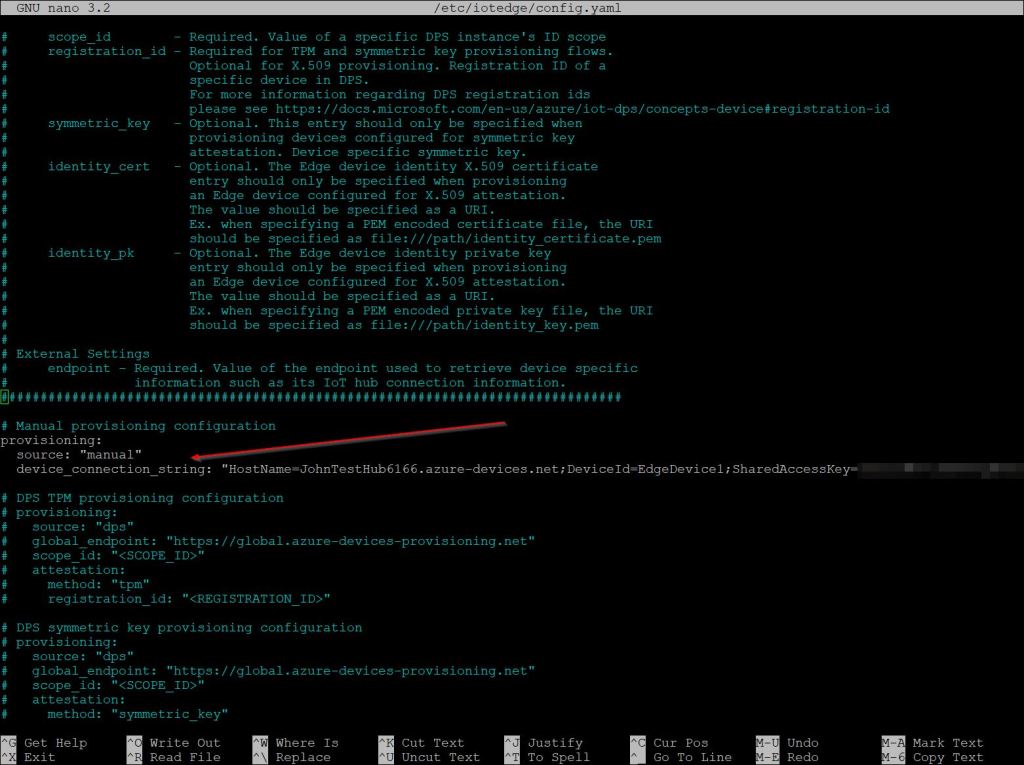
You need to restart the security daemon to have the changes you made take effect, so run this command to restart IoT Edge on the device:
sudo systemctl restart iotedge
You can list the running modules on your device with this command. Please note that this point you should only see the edgeAgent module (since we haven’t deployed a module to the device yet).
sudo iotedge list
From this point you can follow the remaining steps from the first demo as they are identical. You would deploy your module from Azure IoT Hub in the portal, and once you do that you should be able to check the running modules on your physical device and see telemetry data (from the Simulated Temperature Sensor module) being sent to Azure IoT Hub.
Congratulations! You have deployed an IoT Edge module to an actual physical device! You can now experiment further on creating other modules that can be deployed to your device.
I hope this article was helpful in explaining what Azure IoT Edge was and how you can deploy it to a simulated and real IoT Edge device. For more information on IoT Edge please visit https://docs.microsoft.com/en-us/azure/iot-edge/.
Thanks for reading!
